Cinematic Workflow Guide — Sameer Baloch
The Divide by Sameer Baloch
Complete Production Workflow

BUILDING CINEMATIC
DIGITAL ART

From the first reference image to the final Photoshop composite. Every step, every decision, exactly how I work after 15 years.

10
Chapters
12
Render Passes
14
Composite Layers
15+
Years Experience
Chapter 01

REFERENCE &
MOOD BOARD

Every great artwork starts before the software opens.

Before I open Maya or Unreal Engine, I spend 10 to 15 minutes on reference. This is not optional. The reference shapes everything: mood, lighting direction, colour palette, composition, atmosphere. Most beginners treat it as a quick browse. Professional artists treat it as a creative brief.

Where I Look
Pinterest
Search by emotion, not subject. "Dark cinematic environment" gives you nothing. "Cold isolated vastness" gives you everything.
ArtStation
Real 3D artist work, same tools, same software. Read the process posts, not just the finals.
Film Stills
The best lighting reference that exists. Screenshot frames from films whose visual language matches your goal.
80.lv
Production breakdowns from working game artists. Real pipeline insight, not portfolio showcases.
From My Workflow

I do not look for images to copy. I look for images that tell me how a specific mood is built. Then I understand the technical decisions behind it and apply them to my own concept.

Chapter 02

CONCEPT
DEVELOPMENT

From someone else's work to your own vision.

The concept stage happens entirely in 2D, before any 3D software opens. Reference is the starting point, not the destination. This stage answers one question: what should the viewer feel?

A
Rough Sketch on Reference
Draw directly on top of your reference. Rough lines, shapes, composition changes. It needs to answer: where is the subject, where is the camera, what is the emotional centre?
B
Photoshop Image Patching
Composite different reference images together at low quality. A sky from one, ground from another. Confirm composition and mood work in 2D before building in 3D.

Before opening 3D software, answer this: what should the viewer feel? Not "cool" or "dramatic". Name it: "isolated", "overwhelmed", "afraid". Every decision that follows serves that answer.

Chapter 03

MODELING
& ASSETS

Build what you need. Download what makes sense.

I model to my concept, not beyond it. If the camera will never see the back of an object, the back does not need detail. The most common beginner mistake is spending too long on modeling before the composition is locked.

Build Custom

Hero objects. High-detail foreground elements. Anything with a unique silhouette the camera focuses on.

Use Asset Libraries

Background filler, repeating environment elements, standard props. Fab.com, Quixel Megascans, KitBash3D.

Chapter 04

TEXTURING

2K to 4K is enough. Cinematic quality comes from lighting, not texture resolution.

The material properties that actually define render quality are roughness and reflectivity. Get these right and a 2K texture beats an 8K texture with wrong values every time.

Maya Redshift vs UE5 material settings side by side
Exact roughness values for metal, ice, rock, skin, fabric
Why Metallic should only ever be 0 or 1
Normal map scale settings that prevent over-detailing
Full chapter in Full Access
Chapter 05

SCENE BUILDING
& STAGING

Composition is locked before a single light is placed.

The grey clay view is the most important checkpoint in the entire workflow. If the image does not read in flat grey, lighting will not save it.

The exact grey clay checklist before look dev begins
Wireframe to greyscale comparison from The Divide project
How to confirm foreground, midground, background depth
The camera lock rule and why breaking it costs hours
Full chapter in Full Access
Chapter 06

CAMERA &
FOCAL LENGTH

Lock the camera before you touch a single shader.

Focal length is not a technical preference. It is a storytelling decision. 12mm and 120mm create entirely different emotional responses to the same scene.

12mm to 120mm guide with exact use cases and risks
Aperture settings for cinematic depth of field in Maya and UE5
Resolution standard: 1920 x 2400 portrait format
How to lock camera transforms in both pipelines
Full chapter in Full Access
Chapter 07

LOOK
DEVELOPMENT

Materials, lighting, and shaders. Together, not in sequence.

Most beginners finish all materials, then all lights, then adjust shaders. That is the wrong order. Professional look development develops all three together because each one changes the others.

Maya Redshift light setup: rsPhysicalLight, rsIBL, rsAreaLight
UE5 Lumen setup: Sky Atmosphere, Directional Light, Height Fog
The three-light hierarchy: key, fill, rim and why the order matters
Cold fill plus warm key: the formula for cinematic depth
Full chapter in Full Access
Chapter 08

RENDER
SETUP

Every setting that matters, documented.

Render setup is the one stage where the wrong setting costs hours. These are the exact values I use for every final render in both Maya Redshift and Unreal Engine 5.
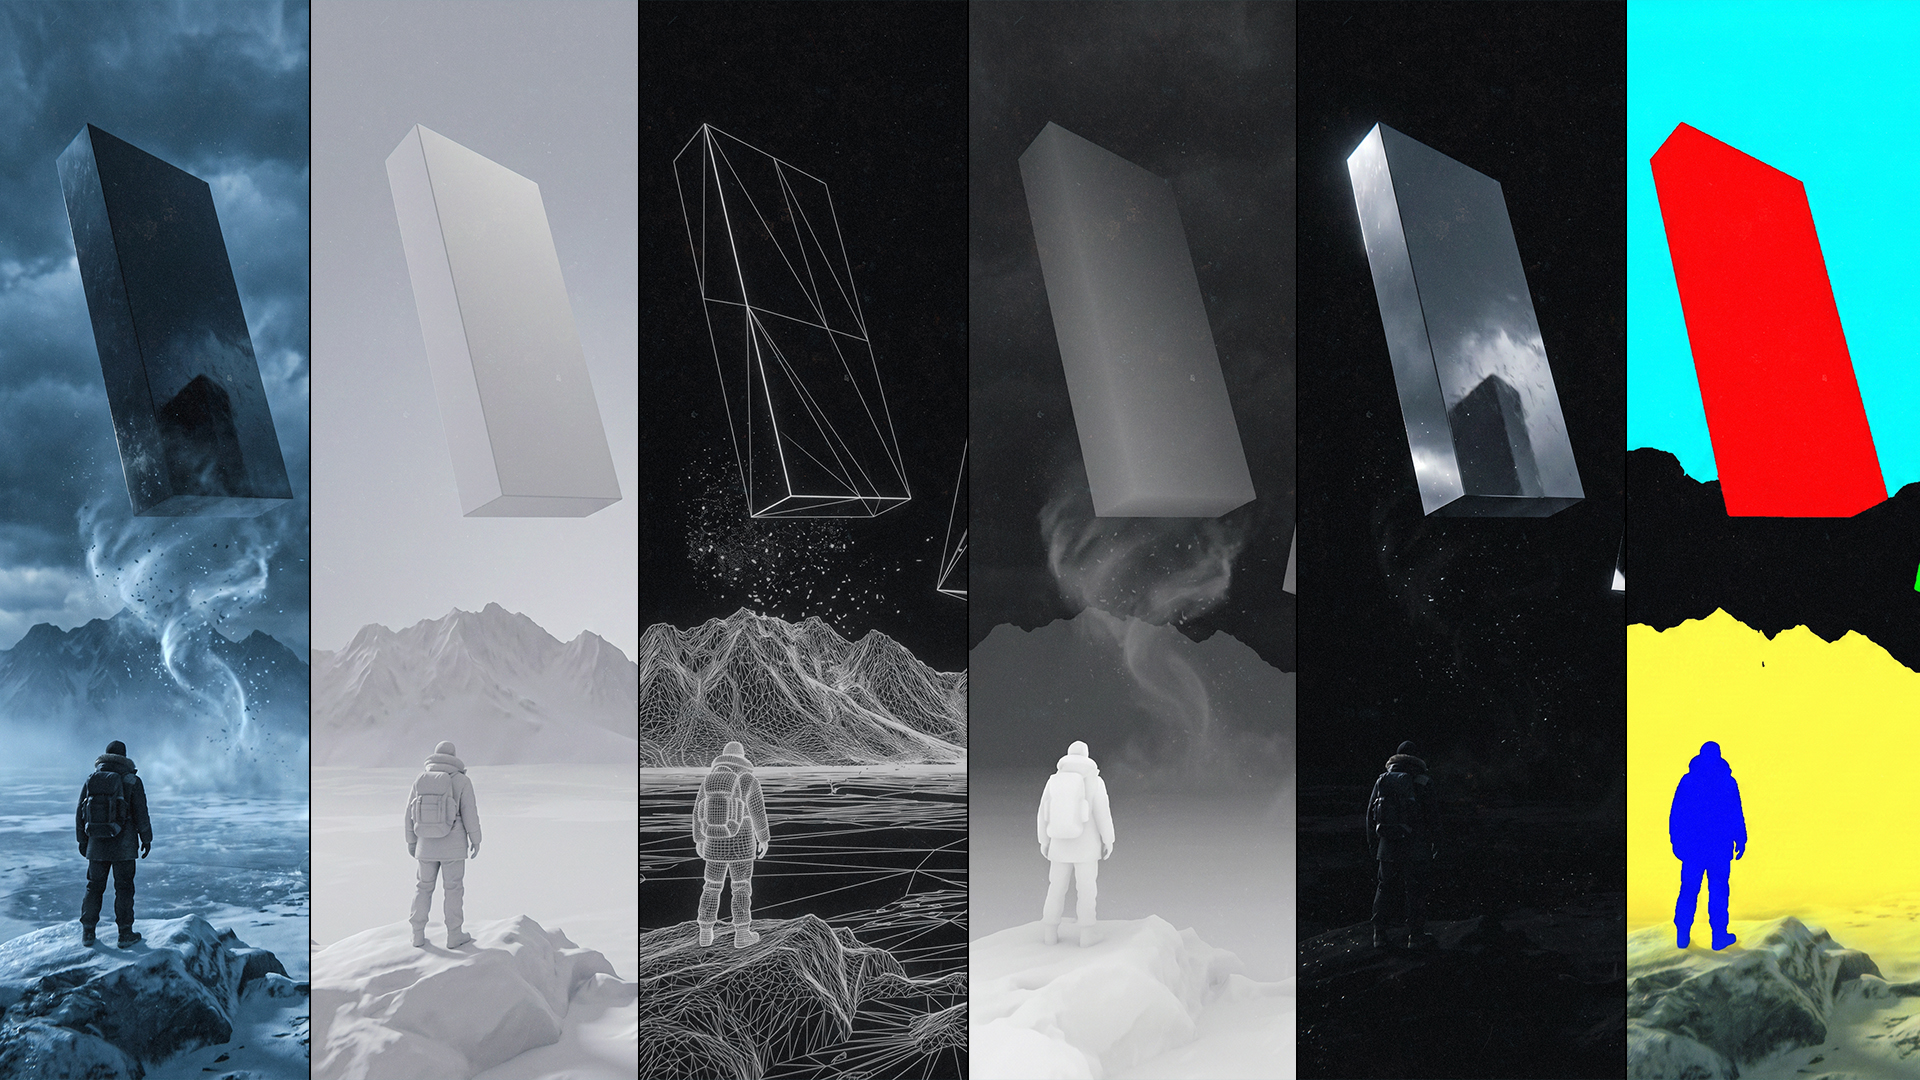
Maya Redshift: sampling, GI, denoiser, output format settings
UE5 Movie Render Queue: anti-aliasing, path tracer, output settings
Why EXR 32-bit is the only output format for compositing
Redshift OptiX denoiser — cuts render time 40 to 60%
Full chapter in Full Access
Chapter 09

RENDER PASSES
& COMPOSITING

The scene decides how many passes you need. Not the tutorial.

A render pass isolates one visual property. In composite, you layer these passes to build a result that gives you precise control over every element without re-rendering.

12 render passes explained with actual images from The Divide
Blend mode for every pass: Multiply, Screen, Soft Light, Add
Why the greyscale test must pass before colour is added
How to use the ID pass as a Photoshop selection mask
Full chapter with all pass images in Full Access
Chapter 10

FINAL PHOTOSHOP
FINISHING

The last 20% that changes everything.

Compositing is where passes become a final image. The order matters. These are the exact 14 layers used in The Divide, from the beauty pass to the final colour grade.

14-layer composite stack, complete order with blend modes
Film grain settings: amount, size, why you never skip this layer
Vignette technique: Multiply mode, soft radial gradient
Colour grade: crush blacks, push cold blues, warm the highlights
Full composite breakdown in Full Access
Full Access

UNLOCK THE
COMPLETE GUIDE

Chapters 4 to 10 in full. All 12 render passes with actual images from The Divide. The complete 14-layer composite breakdown. The full project walkthrough from wireframe to final poster. One code, instant access.

Buy Now on Gumroad, $29

After purchase, your access code arrives in your confirmation email.
First 20 Instagram YES comments get free access.

© 2026 Sameer Baloch, sameerbaloch.com

Full Access
ENTER CODE

Enter your access code to unlock the complete guide with all render passes and project breakdown.

Invalid code. Please try again.
OR
Buy Full Access, $29

Access code arrives in your Gumroad confirmation email.
First 20 Instagram YES comments get free access.